

Monday, November 4, 2013

NYC Smooth Skin Bronzer Review

NYC's Smooth Skin Bronzing Powder in Sunny has been a favorite of many drug store make-up shoppers. It is often compared to Benefit's Hoola bronzer because of its coloration and matte finish. Personally, I have never tried Hoola bronzer, but I am definitely in love with this one. It is very inexpensive and has the perfect color for a large range of skin tones. It adds enough color to contour and it blends well. The only downside to this product is that it only comes in one color, though it does fit many skin tones. Overall, this product is inexpensive and will probably be my go to bronzer for a while.
Sunday, November 3, 2013
Harley Quinn Make-Up Tutorial
Everybody loves super heroes, but what about the super villains? Without them there wouldn't be any heroes! Personally my favorite super villain is Harley Quinn, so here is my take on her.


First, take an eye safe cream make-up in white and apply it to your eyebrows and about an inch under your eyes. I prefer it to be cream otherwise it dries out and irritates the skin around my eyes.

Next, take an white face paint (you can use the previous on your a more opaque one) and apply it all over your face and down your neck, depending on what your costume covers.

First apply a winged eye liner and your normal mascara. If you'd like apply false lashes in this step (Its not shown in this picture and trust me, it was a pain to put them on after the mask was painted on). For the mask, use a black face paint and a thin brush and create an arch over your eyebrows and on the outside of the arch flick it out like a cat eye, thicken this up to your liking. Then create arches underneath your eye that connect in the middle and on the outside.

Take a deep wine colored lip liner and line your lips. Leave the inside of your lips bare, because that will give us a more dramatic effect later.

Apply your favorite red lipstick all over your lips, the insides should be a more true red while the outsides will be darker.
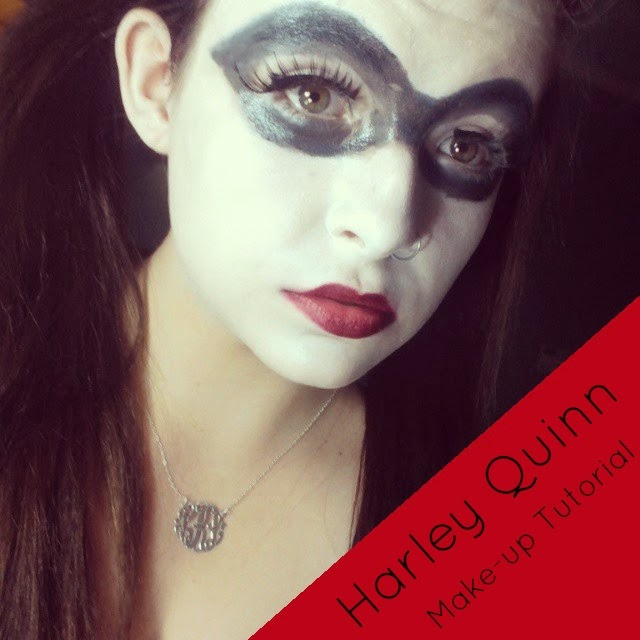
You are finished! :)
Avon Nailwear Pro Review

I recently received this nail polish as a gift and I was super excited because I have never used an Avon nail polish before. The color I received is Midnight Plum. I took off my nail polish from a few days before and applied it. It was a super cute grape jelly color. It went on smooth, but it was a bit transparent. After the first coat dried, I applied another and it was completely opaque. The finished result is a super shiny deep purple that is, just like E.L.F.'s Midnight Blue, a great alternative to the normal black polish.
Overall, I really enjoyed the finished product because it is shiny without a top coat and it only needs two layers for a completely opaque finish.
Monday, October 28, 2013
Halloween Nails: Pumpkins
Nail art is super trendy and super fun. When it comes to different holidays we all want to have festive nails. In this tutorial I will be showing you how to get Halloween ready nails!


Here's what you'll need. A grey polish, I'm using China Glaze's Recycle (this can be replaced with any color you'd like I just like the gray). A green, preferably one with shimmer, I'm using Caribbean Frost bye Wet 'N' Wild. An orange which is NYC's Times Square Tangerine Creme. A gold sparkle top coat I'm using COVERGIRL's Boundless Color in Gold Rush. The last polish you'll need is a black, I'm just using one from the dollar store. Finally you'll need some pins.

Start off with clean and filed nails. It doesn't matter how your file them, just do your normal routine.

Next, paint all of your nails, except your ring finger, with your grey or your substitute. On your ring finger use your orange color. Apply as many coats as you need then let them dry.

Using one of the pins, dip it into your black polish and draw a Jack O'lantern face.

Now, using the same pin and the black polish, draw lines like you would see on a pumpkin.

Now, taking the green, you can use a pin or just brush the color to the tip of your nail to make it look like the stem. Using the gold dab it into the eyes to give it a glowing affect.

And now your done! :)
Friday, October 25, 2013
Halloween Make-up: Dead Girl
We all want to look great for Halloween, whether that be looking super cute or super spooky. Knowing how to make yourself look dead is huge when creating the perfect scary look. Here is my take on it.

First, white out your face. You can use any white face paint you want. There is white tube paint or water activated paint like the one I am using. Avoid your eye lids and under eyes. *WARNING* Moisturize before applying full face make-up or paint. It can dry out the skin ALOT.

Next draw circles around your eyes with black pencil eye liner. The top of the circle should be around your eye brow and the bottom should be about 3/4th of an inch under the eye. Fill in the circle with the eye liner and smug out with your finger. This will act as a base for the next step. *Skip this step and the next if you have black face paint. Just draw a circle around the eye with that and fill it in*

Now, take a matte black eye shadow and apply it over the eye liner you smudged out on your eyes. This may take a few coats to get it solid. With the same eye shadow contour under your cheek bones and on your temples. Smudge this out with your finger.

For the nose, apply the black eye liner first and smudge it out with your finger. Then apply black eye shadow on top. Dab a little bit of the white face paint on your lips if it is mouth safe. Don't worry about making it opaque because it is just a base. *If you have black paint, use it on the nose.*

Find a blue eye shadow. I used the darkest color in Rimmel's Maritime palette. Apply this under your eyes to create bags, under the cheek bones and around the mouth. You also want to put it on your lips. With this step, make it a little messy. Things don't need to be symmetrical, after all you are dead.
 You make up look is complete!

First, white out your face. You can use any white face paint you want. There is white tube paint or water activated paint like the one I am using. Avoid your eye lids and under eyes. *WARNING* Moisturize before applying full face make-up or paint. It can dry out the skin ALOT.

Next draw circles around your eyes with black pencil eye liner. The top of the circle should be around your eye brow and the bottom should be about 3/4th of an inch under the eye. Fill in the circle with the eye liner and smug out with your finger. This will act as a base for the next step. *Skip this step and the next if you have black face paint. Just draw a circle around the eye with that and fill it in*

Now, take a matte black eye shadow and apply it over the eye liner you smudged out on your eyes. This may take a few coats to get it solid. With the same eye shadow contour under your cheek bones and on your temples. Smudge this out with your finger.

For the nose, apply the black eye liner first and smudge it out with your finger. Then apply black eye shadow on top. Dab a little bit of the white face paint on your lips if it is mouth safe. Don't worry about making it opaque because it is just a base. *If you have black paint, use it on the nose.*

Find a blue eye shadow. I used the darkest color in Rimmel's Maritime palette. Apply this under your eyes to create bags, under the cheek bones and around the mouth. You also want to put it on your lips. With this step, make it a little messy. Things don't need to be symmetrical, after all you are dead.

Tuesday, October 22, 2013
Top 5 Lip Colors for Fall

A huge fall trend is bold lip colors. Not everyone wants to go super bright and bold, so I have a whole range of colors that are my favorite's for fall.

My first pick is E.L.F's Lip Stain in Nude Nectar. It is the swatch on the left. I like this because it gives your lips a little pop of color without having to commit to a full blown red lip.

Next is Mocha by NYC. This color can be worn by itself for a neutral effortless look or it can be paired with a bold color to give you an edgy and trendy metallic look. It is the second swatch on the left.

Lipstick pencils are great for carrying in your purse or backpack. My favorite is COVERGIRL's Lip Perfection Jumbo Gloss Balm in 250. It moisturizes your lips like a balm, but gives you the color payoff of a lipstick. You can also wear it more sheer for a stain effect. Its swatch is in the middle.

Next is another lip balm type item. This is Wet'n'Wild's Megashield in That's Berry Beautiful. It is a true red color and would match any skin type. Just like the Jumbo Gloss Balm, it can be worn sheer or with full color. It's swatch is the second to the right.

This last one is probably my favorite. It is Sephora's Maniac. It is a deep berry color and its perfect for fall. I found it on the clearance rack while hunting for some fall lip colors and I feel in love. It lasts long and the color is beautiful. I personally apply it then blot it so its not to heavy. Its swatch is all the way to the right.
Subscribe to:
Posts (Atom)